Radiographic Positioning of the Wrist

Wrist PA
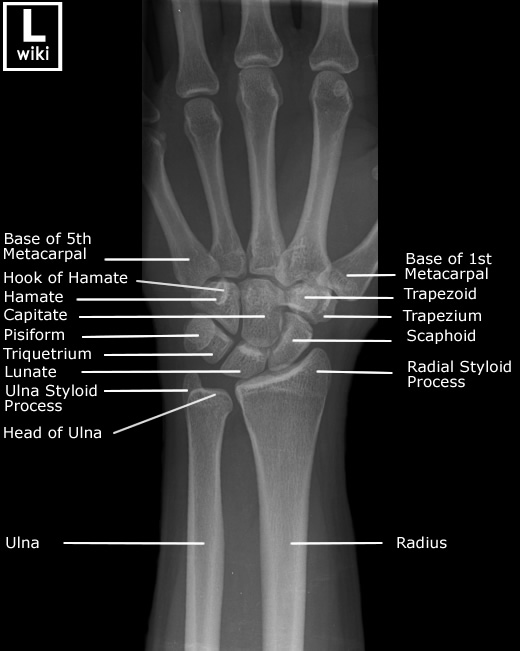
Purpose and Structures Shown: This view should demonstrate the bones specifically the carpals, distal radius and ulna and proximal metacarpals and soft tissue of the wrist.
Position of patient: Seated sideways at the end of the table. Place arm on the table with elbow bent. Ideally, upper arm, elbow, and forearm are all resting on the table.
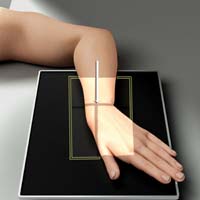
Position of part: Wrist prone palm down, flex fingers.
Central ray: Perpendicular to the image receptor at center of wrist.
Video Credit : Radpositioning49
WRIST AP


Purpose and Structures Shown: This view is an alternative to the wrist PA view.
Position of patient: Seated sideways at the end of the table. Place arm on the table with elbow bent. Ideally, upper arm, elbow, and forearm are all resting on the table.
Position of part: Wrist prone palm up, extend fingers. Elevate digits slightly if possible to place the wrist in close contact to the image receptor. Make the patient lean laterally to avoid wrist rotation.
Central ray: Perpendicular to the image receptor at center of wrist.
Wrist Tangential carpal bridge


Source: http://www.wikiradiography.net
Purpose and Structures Shown: This view should demonstrate the Scaphoid fractures, calcifications, lunate dislocations, presence of foreign bodies in dorsum area of the wrist, and chip fractures of the dorsal surface of the carpals.
Position of patient: Seated sideways or standing at the side of the table.
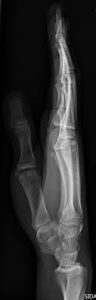
Position of part: Original Method: The back of the hand should be in contact with the image receptor and perpendicular angled with the forearm.
Modified Method: When Elevate the forearm then flex the wrist to make a perpendicular angle with the forearm. The image receptor is vertically positioned.
Central ray: 45 degree caudal angle, 1 1/2 inch cephalic of bend at wrist.
Wrist Tangential Inferosuperior Gaynor-Hart Method


Video Credit : Radpositioning49
Purpose and Structures Shown: This view is for identifying abnormalities of the tissues in the canal and fractures of hamate, trapezium, and pisiform bones (Palmar surface of trapezium, tubercle of trapezium, Capitate, Scaphoid, Triquetrum, Hook of Hamate, and Pisiform) and soft tissue of the wrist.
Position of patient: Seated sideways at the end of the table. Place arm on the table with elbow bent. Ideally, upper arm, elbow, and forearm are all resting on the table.
Position of part: Hyperextend the wrist. Center the joint at the area of the radial styloid process to the midportion of the image receptor. Make the long axis of the hand as vertical as possible without causing pain or discomfort. (you may need to consult a physician as to how much is practical.) Slightly rotate the hand towards the radial side to prevent superimposition of the hamate’s and pisiform’s shadows. Hold the wrist in an extended position by having the patient or someone grasp the digits either by using the opposite hand or using a device.
Central ray: 1 inch distal to the base of the 3rd metacarpal at an angle of 25-30 degrees in reference to the long axis of the hand.
Wrist Tangential inferosuperior

Purpose and Structures Shown: An alternate method with similar results to the Gaynor-Hart Method.
Position of patient: Standing at edge of the table.
Position of part: Reach back and place fingers on the edge of the image receptor. Dorsiflex the wrist as much as tolerable and lean forward to position the carpal canal perpendicular to the image receptor at the image receptor. A support such as a 45 degree angle sponge may be placed under the palm when dorsiflexion of the wrist is limited.
Central ray: Tangential to carpal canal and directed at midcarpal area and perpendicular to the image receptor or angulated towards the hand approximately 20-35 degrees from the forearm’s long axis.
Wrist PA Oblique Lateral rotation


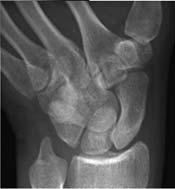
Purpose and Structures Shown: This view should demonstrate the carpals on lateral side of wrist (Scaphoid and Trapezium) and soft tissue of the wrist.
Position of patient: Seated sideways at the end of the table. Place arm on the table with elbow bent. Ideally, upper arm, elbow, and forearm are all resting on the table.
Position of part: Rest the surface of the wrist over the image receptor. From a prone position, rotate wrist laterally approximately 45 degrees. Use a translucent support if appropriate. When the scaphoid is to be examined, ulnar deviate the wrist.
Central ray: Perpendicular to the image receptor at center of wrist.
Video Credit : Radpositioning49
WRIST OBLIQUEs
Purpose and Structures Shown: This view should demonstrate the carpals on lateral side of wrist (Scaphoid and Trapezium) and soft tissue of the wrist.
Position of patient: Seated sideways at the end of the table. Place arm on the table with elbow bent. Ideally, upper arm, elbow, and forearm are all resting on the table.
Position of part: Rest the surface of the wrist over the image receptor. For a lateral rotation oblique, from a prone position, rotate the wrist laterally approximately 45 degrees. For a medial oblique, medially rotate the wrist 45 degrees. Use a translucent support if appropriate. When the scaphoid is to be examined, ulnar deviate the wrist. Note that AP obliques are sometimes ordered as well, which would begin with the patient’s palm up then rotate medial or lateral 45 degrees.
Central ray: Perpendicular to the image receptor at center of wrist.
Video Credit : Radpositioning49
Video Credit : Radpositioning49
Wrist PA Ulnar Deviation (Scaphoid)
Purpose and Structures Shown: This view should demonstrate the scaphoid and its adjacent articulations, carpals, open space between lateral carpals and soft tissues and trabecular areas of the wrist.
Position of patient: Seated sideways at the end of the table. Place arm on the table with elbow bent. Ideally, upper arm, elbow, and forearm are all resting on the table.
Position of part: Place the palm down thumb abducted. Slightly ulnar deviate hand.
Central ray: The central ray should be perpendicular to the image receptor and centered to the scaphoid. 10 to 15 degrees angulation distally may provide clear delineation sometimes.
The Rafert-Long Method requires 4 exposures at 0, 10, 20, and 30 cephalad angles.
Video Credit : Radpositioning49
Wrist PA Radial deviation


Purpose and Structures Shown: This view should demonstrate the carpals and their articulations in the medial wrist, the open space between medial carpals, and the soft tissues and bony trabecular areas of the wrist.
Position of patient: Seated sideways at the end of the table. Place arm on the table with elbow bent. Ideally, the upper arm, elbow, and forearm are all resting on the table.
Position of part: Place the wrist prone on the image receptor. Move the hand medially so the wrist is in extreme radial deviation.
Central ray: Perpendicular to the image receptor at the center of the wrist.
Wrist PA Axial Stecher Method


Purpose and Structures Shown: This view should demonstrate the the carpals, proximal half of metacarpals, distal radius and ulna and soft tissues and bony trabecular areas of the wrist.
Position of patient: Seated sideways at the end of the table. Place arm on the table with elbow bent. Ideally, upper arm, elbow, and forearm are all resting on the table.
Position of part: Wrist supine.
First Stecher Method.
Finger end of the the image receptor elevated at a 20 degree-angle. Ulnar deviation if appropriate.
Second Stecher Method.
The image receptor flat on the the table.
Third Stecher Method.
Make a fist. This elevates the distal area of scaphoid making it parallel to the the image receptor.
Central ray: First and Third Methods: perpendicular to the image receptor and directed to scaphoid. Second Method: approximately 20 degrees cephalic to the elbow.
Wrist Trapezium PA Axial Oblique Clements-Nakayama Method


Note that there is a Clements-Nakayama Method for the hip also.
Purpose and Structures Shown: This view should demonstrate the bones and soft tissue of hand including the carpals, metacarpals, phalanges. No rotation of the hand should be observed.
Position of patient: Seated sideways at the end of the table. Place arm on the table with elbow bent. Ideally, upper arm, elbow, and forearm are all resting on the table.
Position of part: Place the hand in a lateral position over the the image receptor with the ulnar surface of wrist on the the image receptor. Rotate the hand thumb 45 degrees. Use a translucent wedge if available. Have the patient pull thier fingers away from their body for ulnar deviation if appropriate. If ulnar deviation can’t be maintained comfortably, bring into line the straight wrist and the the image receptor then rotate approximately 20 degrees the elbow end of the the image receptor away from the CR.
Central ray: Perpendicular to the image receptor at snuffbox and trapezium.
UpEx
Get 24 Category A ARRT® CE Credits in the X-Ray CE Course “Radiography of the Upper Extremities”
