Radiographic Positioning of the Hand and Fingers

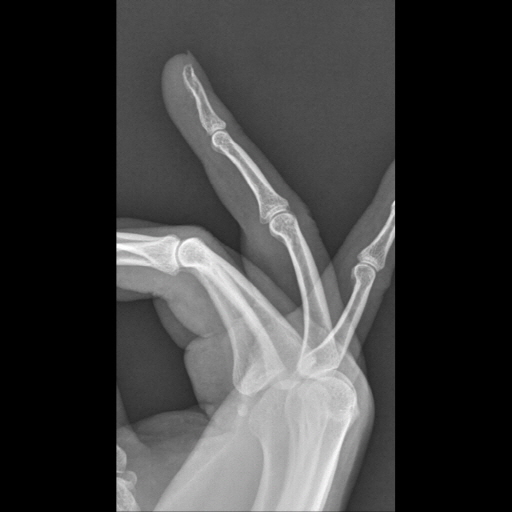
Finger Lateral
Purpose and Structures Shown: This view should demonstrate the bones and soft tissue of the finger.
Position of patient: Seated sideways at the end of the the table. Place arm on the table with elbow bent. Ideally, upper arm, elbow, and forearm are all resting on the table.
Position of part: Twist wrist to position finger so that it’s side is touching or as close as possible to the image receptor (IR). More importantly that it is sideways relative to the IR and so that it is isolated from the other digits. Center digit to be examined on the image receptor.
Central ray: Perpendicular to the image receptor and directed to the PIP joint of the digit being examined.
Video Credit : klhellens
Purpose and Structures Shown: This view should demonstrate the bones and soft tissue of the finger.
Position of patient: Seated sideways at the end of the the table. Place arm on the table with elbow bent. Ideally, upper arm, elbow, and forearm are all resting on the table.
Position of part: Palm down. Slightly separate the digits. Center digit to be examined on the image receptor.
Central ray: Perpendicular to the image receptor and directed to the PIP joint of the digit being examined.
Fingers PA oblique


Purpose and Structures Shown: This view should demonstrate the bones and soft tissue of the finger.
Position of patient: Seated sideways at the end of the the table. Place arm on the table with elbow bent. Ideally, upper arm, elbow, and forearm are all resting on the table.
Position of part: Place forearm on the table with pronated hand placed over the image receptor. Externally rotate hand 45 degrees and separate digits. Support hand using 45 degree foam wedge if appropriate.
Central ray: Perpendicular to the image receptor and directed to the PIP joint of the digit being examined.
Thumb AP

Purpose and Structures Shown: This view should demonstrate the bones and soft tissue of the 1st digit (thumb).
Position of patient: Seated sideways at the end of the the table. Place arm on the table with elbow bent. Ideally, upper arm, elbow, and forearm are all resting on the table.
Position of part: Hand rotated internally on the the table. Thumb extended thumbnail down on the table. Other digits back out of exposure. Avoid superimposition of other digits.
Central ray: Perpendicular to the image receptor and directed to the PIP joint of the digit being examined.
Thumb PA


Purpose and Structures Shown: This view should demonstrate the bones and soft tissue of the 1st digit (thumb).
Position of patient: Seated sideways at the end of the the table. Place arm on the table with elbow bent. Ideally, upper arm, elbow, and forearm are all resting on the table.
Position of part: Position hand lateral side down. For true PA, thumb is elevated. Place thumb over support if needed. Dorsal surface of the thumb should be parallel to the the image receptor.
Central ray: Perpendicular to the image receptor and directed to the PIP joint of the digit being examined.
V
Video Credit : klhellens
Thumb PA Oblique

Purpose and Structures Shown: This view should demonstrate the bones and soft tissue of the 1st digit (thumb).
Position of patient: Seated sideways at the end of the the table. Place arm on the table with elbow bent. Ideally, upper arm, elbow, and forearm are all resting on the table.
Position of part: Place palm down thumb abducted. Slightly ulnar deviate hand.
Central ray: Perpendicular to the image receptor and directed to the PIP join
t of the digit being examined.
HAnd PA


Purpose and Structures Shown: This view should demonstrate the bones and soft tissue of hand including the carpals, metacarpals, phalanges. No rotation of the hand should be observed.
Position of patient: Seated sideways at the end of the the table. Place arm on the table with elbow bent. Ideally, upper arm, elbow, and forearm are all resting on the table.
Position of part: Hand centered palm down flat, fingers separated. The central ray should be perpendicular to the image receptor at 3rd MCP joint.
Central ray: Perpendicular to the image receptor at 3rd MCP joint.
Video Credit : klhellens
Hand PA Oblique


Purpose and Structures Shown: This view should demonstrate the bones and soft tissue of hand including the carpals, metacarpals, phalanges. No rotation of the hand should be observed.
Position of patient: Seated sideways at the end of the the table. Place arm on the table with elbow bent. Ideally, upper arm, elbow, and forearm are all resting on the table.
Position of part: Hand in center of the image receptor rotated 45 degrees, fingers separated. Cone to part of interest.
Central ray: Perpendicular to the image receptor at 3rd MCP joint.
HAND lATERAL


Purpose and Structures Shown: This view should demonstrate the bones and soft tissue of hand including the carpals, metacarpals, phalanges. No rotation of the hand should be observed.
Position of patient: Seated sideways at the end of the the table. Place arm on the table with elbow bent. Ideally, upper arm, elbow, and forearm are all resting on the table.
Position of part: For Lateromedial: Thumb up.
For Lateromedial Flexion, Thumb up, hand cupped.
For Mediolateral: Thumb down.
For Fan: Thumb up, fingers separated.
Central ray: Perpendicular to the image receptor at 3rd MCP joint.
HAND AP FIRST CARPOMETACARPAL JOINT


Purpose and Structures Shown: This view should demonstrate the First CMC joint spaces, base of first metacarpal and trapezium.
Does not show interphalangeal joint spaces.
Modifications to show specific areas of joint spaces.
Position of patient: Seated sideways at the end of the the table. Place arm on the table with elbow bent. Ideally, upper arm, elbow, and forearm are all resting on the table.
Position of part: Extend the arm straight out on the the table and rotate the arm internally.
Place the posterior of the thumb on the the image receptor with the thumbnail down.
Hyperextend the hand.
Central ray: For Robert method, perpendicular to the image receptor entering at the first CMC joint.
For Rotert modification, angled 15 degrees proximally entering the first CMC joint.
For Lewis modification, angled 10 to 15 degrees proximally entering the first MCP joint.
Hand AP First Carpometacarpal Joint Burman Method

Purpose and Structures Shown: First CMC joint spaces, base of first metacarpal convex profile, and trapezium concave profile.
Position of patient: Seated sideways at the end of the the table. Place arm on the table with elbow bent. Ideally, upper arm, elbow, and forearm are all resting on the table.
Position of part: Extend the arm straight out on the the table and rotate the arm internally.
Cup the hand keeping the metacarpals in line with the forearm.
Hold the hand position with a cloth looped around the digits if needed.
Central ray: 45 degrees toward the elbow through the first CMC joint. 18 inches SID to produce a magnified image.
Hand AP First Carpometacarpal Joint Folio Method

Purpose and Structures Shown: First CMC joint spaces. Shows also the first metacarpals and the First MCP joint. Useful for the diagnosis of ulnar collateral ligament rupture.
Position of patient: Seated sideways at the end of the the table. Place arm on the table with elbow bent. Ideally, upper arm, elbow, and forearm are all resting on the table.
Position of part: Hands touching the cassette on their medial aspects.
Rubber band around the distal portion of both thumbs and a roll of medical tape between the first metacarpals.
Thumbs in the PA plane, thumbnails parallel to the cassette.
Have patient pull thumbs apart and hold.
Central ray: Perpendicular to the image receptor between both hands.
UpEx
Get 24 Category A ARRT® CE Credits in the X-Ray CE Course “Radiography of the Upper Extremities”
