Radiographic Positioning of the Chest
This article discusses radiographic positioning of the chest for the Radiologic Technologist (X-Ray Tech).

- Chest PA
- Chest Lateral
- Chest AP Sitting Erect
- Chest Lateral Sitting Erect
- Chest AP Supine
- Chest Apical (Lordotic) AP
- Chest Lateral Decubitus
- Chest PA Oblique Projection
- Chest PA Oblique Projection Moore Method
- Chest Axiolateral Projection Kurzbauer Method
- Ribs Oblique AP Standing or Sitting Erect
- Ribs Oblique AP Supine
- Chest AP Erect for Infants
- Chest AP Supine for Infants
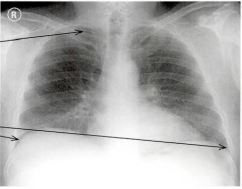
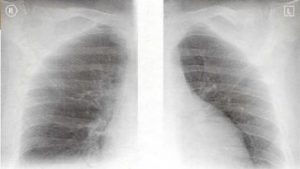
Radiologists consider a chest X-ray to be of good quality when the trachea is centered and equidistant from the head of the clavicle on both sides, the spine is visible as a transparent structure through the heart shadow, and there is full inspiratory effort (the right 6th rib is at the midpoint of the hemidiaphragm on that side). A useful search pattern is described by the mnemonic ABCDEF for airways, bones, cardiac silhouette, diaphragm, expanded lungs, and foreign objects.
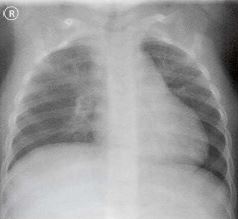
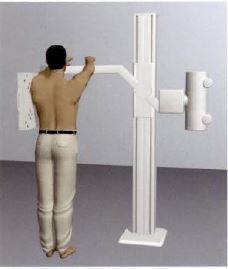
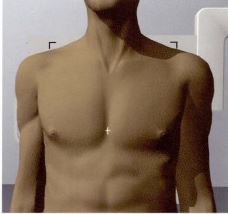
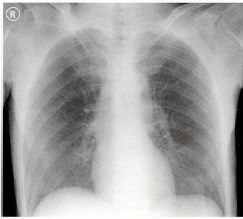
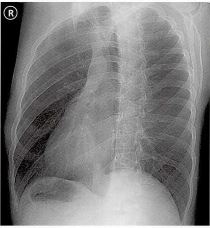
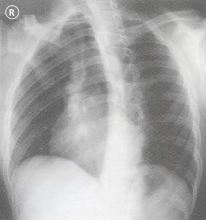
Chest PA
Purpose and Structures Shown To get a clear posteroanterior image of the chest cavity and lungs.
Position of patient Standing erect. Make sure the patient presses the shoulders forward. The patient should be asked to take a deep breath and suspend breathing while the exposure is taken.
Position of part The top of the lungs should be visible. The exposure should be made at full inspiration and should show rib 10 posteriorly above the diaphragm and rib 6 anteriorly. Both costophrenic angles and the lower parts of the diaphragm should be visible. The lungs and spine should be visible behind the heart shadow.
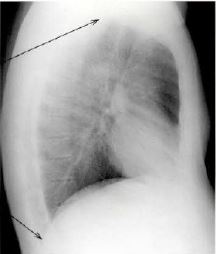
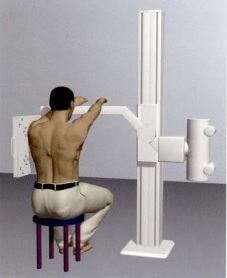
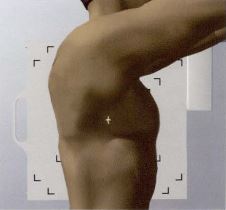
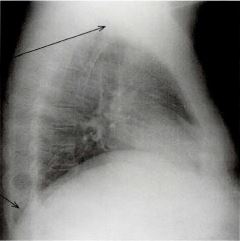
Chest Lateral
Purpose and Structures Shown To demonstrate the lateral image of the chest.
Position of patient Standing erect – left or right (usually left lateral is shown). The patient should be leaning slightly forward with the shoulder resting firmly against the grid. The hands should be locked behind the back to rotate the shoulders posteriorly or arms should be raised in front or above the head. The patient should be asked to take a deep breath and hold the breath while the exposure is taken.
Position of part The top of the lungs must be visible. The sternum should be centered to the midline of the grid and must be visible in its entirety in straight lateral view. The sternum should NOT be superimposed by the ribs. The lower parts of the diaphragm must be seen.
Video Credit : klhellens
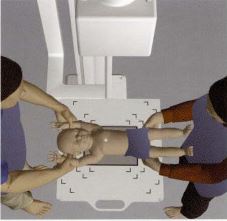
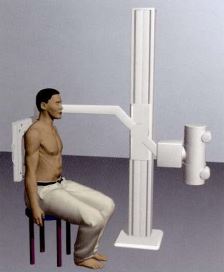
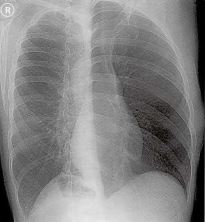
Chest AP Sitting Erect
Purpose and Structures Shown To get clear image of the chest cavity and lungs in patients who are unable to stand.
Position of patient Sitting erect on a stool or trolley. The patient should be asked to take a deep breath and hold the breath while the exposure is taken.
Position of part The top of the lungs should be visible. The exposure should be made at full inspiration and should show both costophrenic angles and the lower parts of the diaphragm . The lungs and spine should be visible behind the heart shadow.
Chest Lateral Sitting Erect
Purpose and Structures Shown To demonstrate a lateral image of the chest in patients who are unable to stand.
Position of patient Sitting erect (left or right) on a stool or trolley. The patient should be leaning slightly forward. The patient should be asked to take a deep breath and hold the breath while the exposure is taken.
Position of part The top of the lungs must be visible. The sternum must be visible in straight lateral view. The lower parts of the diaphragm must be seen.
Video credit : mosben38
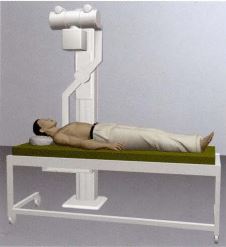
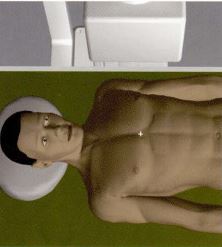
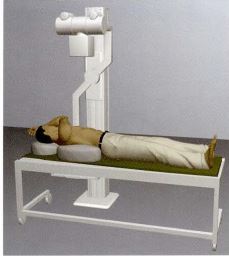
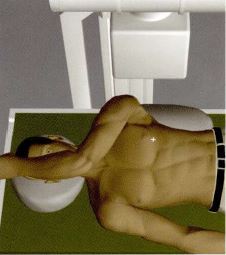
Chest AP Supine
Purpose and Structures Shown To evaluate the chest cavity and lungs in patients who cannot stand or sit.
Position of patient Supine with a pillow under the head and centered on the table. The patient should be asked to take a deep breath and hold the breath while the exposure is taken.
Position of part The top of the lungs should be visible. The exposure should be made at full inspiration and should show both costophrenic angles and the lower parts of the diaphragm . The lungs and spine should be visible behind the heart shadow.
Video Credit : mosben38
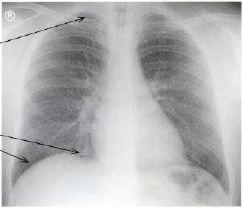
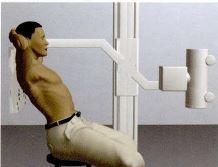
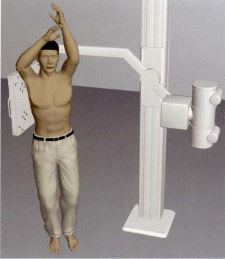
Chest Apical (Lordotic) AP
Purpose and Structures Shown An additional view of the upper parts of the lungs and chest cavity.
Position of patient Sitting reclining backwards with the hands clasped behind the head. The patient should be asked to take a deep breath and hold the breath while the exposure is taken.
Position of part The top of the lungs should be visible.
Video Credit : Gail Scharmberg
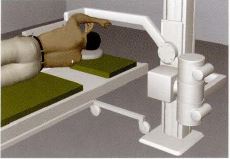
Chest Lateral Decubitus
Purpose and Structures Shown An additional view to detect fluid in the pleural sac.
Position of patient Lying on the right (PA) or left (AP) side. The knees and hips may be flexed for comfort. The patient’s arms should be extended over the head to prevent overlapping the sternum. The patient should be asked to breathe OUT and hold while the exposure is taken. The gonads should be shielded.
Position of part The sternum should be centered to the midline of the grid and perpendicular to the IR. The sternum should be visible entirely and NOT superimposed by the arms or shoulder soft tissues. The right or left pleural sac should be visible.

Video Credit : Jeffrey Jobe
Chest PA Oblique Projection
Purpose and Structures Shown A right anterior oblique position for a slightly oblique projection of the sternum. If this position is difficult in trauma patients, upright positioning may be necessary or the patient may be positioned supine and the left anterior oblique position used with AP oblique projection.
Position of patient Prone. The right anterior oblique position utilizes the heart for contrast. The patient should support their body on a flexed knee and forearm. If breathing technique is used, the patient should be asked to take slow, shallow breaths when the exposure is taken. If a short exposure time is used, the patient should be asked to hold the breath after breathing out. This helps obtain uniform density in the image.
Position of part The left shoulder and hip should be elevated to rotate the thorax. This avoids vertebral and sternal superimposition. On average, rotation of 15-20 degrees is required. The patient’s body should be aligned to center the long axis of the sternum on the midline of the grid. The gonads should be shielded. The entire sternum should be visible, minimally rotated, with the lateral manubrium and sternoclavicular joint NOT superimposed by the vertebrae. Pulmonary markings are blurred or obliterated if the breathing motion is used.
Chest PA Oblique Projection Moore Method
Purpose and Structures Shown A modified prone position for high-quality radiography of the sternum in a more comfortable manner for ambulatory patients in acute pain.
Position of patient Modified prone position. The patient stands at the side of the table in front of the Bucky tray and bends at the waist. The midsternal area is centered on the table over the IR. The patient’s arms are placed above the shoulders to support the side of the head with the palms flat on the table. The patient is asked to take slow, shallow breaths at the time of exposure.
Position of part The IR is placed crosswise in the Bucky tray. The tube is angled at 25 degrees and positioned over the patient’s right when using standard angulation. Use less angulation for larger patients and more angulation for thinner patients. The gonads are shielded. The image shows the sternum in slightly oblique projection. The entire sternum should be visible. There is no superimposition by the vertebrae. Pulmonary markings are blurred or obliterated if the breathing motion is used.
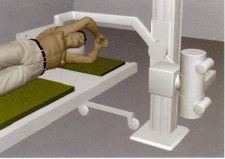
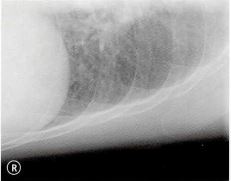
Chest Axiolateral Projection Kurzbauer Method
Purpose and Structures Shown To image the sternoclavicular articulation.
Position of patient Lying on the left or right side (on the affected side). The patient’s knees and hips are flexed for comfort. The patient is asked to take a deep breath and hold at the time of exposure.
Position of part The tube is angled at 15 degrees caudally. The arm on the affected side is fully extended. The patient may grasp the table with this hand for support. The other arm is placed alongside the body and the hip is grasped with this hand to prevent superimposition. The gonads are shielded. The sternoclavicular joint should be visible unobstructed and NOT superimposed by the shoulders.
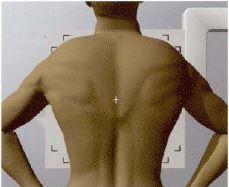
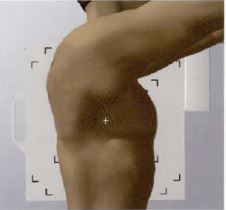
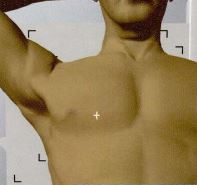
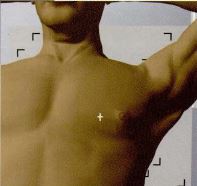
Ribs Oblique AP Standing or Sitting Erect
Purpose and Structures Shown A projection performed to demonstrate the axillary ribs. Chest PA, chest AP sitting erect, or chest AP supine must always be taken first.
Position of patient Standing or sitting erect – right or left oblique. The arms should be raised above the head or held away from the body. For patients who cannot stand or sit, ribs oblique AP supine may be obtained with the patient supported by a pillow, right or left oblique, and the upper arm raised as high as possible. The patient should be asked to take a deep breath and hold the breath while the exposure is taken.
Position of part The 1st to 10th axillary ribs should be demonstrated without superimposition. The thoracic vertebrae should be included.

Video Credit : CentralazRAD
Ribs Oblique AP Supine
Purpose and Structures Shown A projection performed to demonstrate the axillary ribs in patients who cannot stand or sit. Chest PA, chest AP sitting erect, or chest AP supine must always be taken first.
Position of patient Supine – right and left oblique. The patient is supported by a pillow under the normal side. The upper arm is raised as high as possible.
Position of part The patient should be asked to take a deep breath and hold the breath while the exposure is taken.

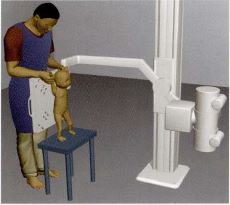
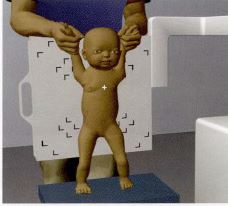
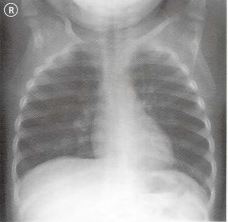
Chest AP Erect for Infants
Purpose and Structures Shown A basic view to demonstrate the chest cavity and lungs in infants and small children weighing up to 15 kg.
Position of patient Erect, hanging by the upper arms, with feet supported by a stool if possible, and back resting against the cassette holder. The exposure should be taken preferably during INSPIRATION when the infant is not moving. The person holding the infant must always wear a lead apron, and when possible, lead gloves.
Position of part Centered between the nipples.
Video Credit : Jeannie Emmert
Chest AP Supine for Infants
Purpose and Structures Shown To show a clear image of the chest cavity in infants weighing up to 10 kg.
Position of patient Supine with the head and legs supported. The exposure should be taken preferably during INSPIRATION when the infant is not moving. The person supporting the infant must always wear a lead apron, and when possible, lead gloves.
Position of part Centered between the nipples. A protective lead strip should be placed on the infant’s pelvic area.