Calcaneus X-Ray Positioning: Radiographic Guide for Heel and Ankle for X-ray Techs

As a radiologic technologist, mastering the art of heel and ankle x-ray radiographic positioning is crucial for accurate diagnosis and patient care. This comprehensive guide covers essential techniques for capturing clear, diagnostic images of the calcaneus bone and ankle joint. Whether your patient is dealing with heel pain, suspected fractures, or other foot-related issues, these positioning methods will help you produce high-quality radiographs that aid in precise diagnoses and effective treatment planning.
Heel X-ray Techniques and Calcaneal X-ray Positioning
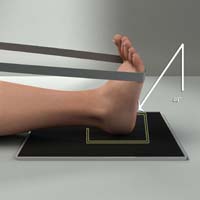
Calcaneus Axial View (Plantodorsal)
Purpose: Clear demonstration of calcaneus and subtalar joint without rotation. This view is particularly useful for identifying calcaneal fractures and assessing the overall structure of the heel bone.
Patient position:
- Supine or seated with legs fully extended
- IR under patient’s ankle, centered to midline
Positioning:
- Place gauze around ball of foot for patient to pull, maintaining ankle at right angle
- If dorsiflexion is limited, raise leg on sandbags to achieve optimal positioning
Central Ray:
- 40° cephalic angle to long axis of foot
- Enters base of third metatarsal
Calcaneus Axial View (Dorsoplantar)

Purpose: Clear demonstration of calcaneus and subtalar joints. This view is essential for assessing calcaneal fractures and evaluating the integrity of the subtalar joint.
Patient Position: Prone
Positioning:
- Elevate ankle on sandbags to achieve proper alignment
- Adjust to dorsiflex ankle, placing foot perpendicular to tabletop
- Place IR against plantar surface of foot
Central Ray:
- 40° caudal angle to long axis of foot
- Enters proximal anterior calcaneus
Heel PA Axial Oblique (Lateral Rotation)

Purpose: Visualize middle and posterior articulations of subtalar joint and sinus tarsi. This view helps in evaluating the posterior facet of the calcaneus and identifying any abnormalities in the subtalar region.
Patient Position: Lateral position on affected side
Positioning:
- Extend affected limb
- Roll limb slightly forward from lateral position
- Elevate heel 1-2 inches
- Angle ball of foot forward approximately 25°
Central Ray:
- 5° anterior and 23° caudal to ankle joint
Broden Method (AP Axial Oblique)

Purpose: Demonstrate posterior articular facet of calcaneus in fracture cases. This method is effective in visualizing fracture lines in the calcaneus and assessing the extent of articular involvement.
Patient Position: Supine with sandbags under knees
Positioning:
- Dorsiflex foot to 90°
- Rotate leg and foot 45° medially
- Rest foot against 45° foam wedge
Central Ray:
- Four separate images at 40°, 30°, 20°, and 10° cephalad angles
- Direct to point 2-3 cm caudoanterior to lateral malleolus
Heel Lateral Rotation

Purpose: Clear demonstration of subtalar joint. Posterior facet of calcaneus. Articulation between talus and sustentaculum tali.
Patient Position: Supine position. The radiologic technologists may adjust small sandbag under each knee of the patient.
Positioning:
- Ankle joint held in right-angle flexion.
- Rotate leg and foot 45 degrees laterally.
- Foot may rest against 45 degrees foam wedge.
Central ray:
- Directed to point 2 cm distal and 2 cm anterior to medial malleolus, at cephalic angle of 15 degrees for first exposure. Two or three images made with a 3 or 4 degrees difference in CR angulation.
Isherwood Method (Lateromedial Oblique)

Purpose: Demonstrate talar articular surface of calcaneus and anterior subtalar joint. This method provides a clear view of the lateral aspect of the calcaneus and is useful for evaluating fractures and arthritic changes.
Patient Position: Semi-supine or seated, turned away from examined side
Positioning:
- Medial border of foot resting on IR
- Place 45° foam wedge under elevated leg
- Adjust foot at right angle
Central Ray:
- Perpendicular to IR
- 1 inch distal and anterior to lateral malleolus
Heel AP Axial Oblique (Isherwood Method)

Purpose and Structures Shown Clear demonstration of posterior articulation of subtalar joint in profile.
Position of patient Supine or seated.
Position of part Ask patient to rotate leg and foot laterally until side of foot and ankle rests against an optional 30-degree foam wedge. Dorsiflex foot, have patient maintain position by pulling on a broad bandage looped around the ball of the foot (see Heel Axial Plantodorsal).
Central ray 10 degrees cephalad at a point 1 inch (2.5 cm) distal to the medial malleolus.
Ankle Joint X-ray Techniques
Ankle AP View

Purpose: Visualize AP projection of ankle joint, distal tibia and fibula, and proximal talus. This view helps in comparing the normal anatomy of the ankle and foot, and identifying fractures or dislocations.
Patient Position: Supine with affected limb extended
Positioning:
- Adjust ankle to anatomic position
- Flex ankle to place long axis of foot vertically
Central Ray:
- Perpendicular to IR
- Through ankle joint midway between malleoli

Ankle Lateral View (Mediolateral)

Purpose: True lateral projection of lower tibia and fibula, ankle joint, and tarsals. This view is crucial for assessing ankle joint alignment and identifying fractures or dislocations.
Patient Position: Supine, turned toward affected side
Positioning:
- Lateral surface of foot in contact with IR. Ensure the lateral surface of the foot is in contact with the image receptor.
- Dorsiflex foot and adjust to lateral position
- Prevent lateral rotation of ankle to maintain true lateral projection
Central Ray:
- Perpendicular to IR at ankle joint
- Enters medial malleolus
Ankle Lateral Lateromedial

Purpose and Structures Shown To get clear lateral image of ankle joint, tibiotalar joint, fibula over posterior half of tibia.
Position of patient Supine Patient turned away from affected side until extended leg is placed laterally.
Position of part Foot in the lateral position. If necessary, place a support under the patient’s knee.
Central ray Perpendicular to IR and through the ankle joint, entering 1/2 inch (1 .3 cm) superior to the lateral malleolus.

Ankle Oblique Views
Ankle Medial Rotation (AP Oblique)

Purpose: Visualize ankle middle articulation, open sinus tarsi, and subtalar joint. This view is particularly useful for assessing the integrity of the lateral ligament complex.
Patient Position: Seated, recumbent, or supine
Positioning:
- Rotate the patient’s foot medially 30°
- Dorsiflex and invert foot if possible to better visualize the lateral structures
Central Ray:
- 10° cephalad
- 1 inch distal and anterior to lateral malleolus
Ankle Lateral Rotation (AP Oblique)

Purpose: Assess fractures and demonstrate superior aspect of calcaneus and subtalar joint. This view is useful for assessing calcaneus fractures and evaluating the subtalar joint space.
Patient Position: Seated with affected leg extended
Positioning:
- Place plantar surface vertically
- Rotate leg and foot 45° laterally
- Rest foot against foam wedge for stability
Central Ray:
- Perpendicular to IR
- Entering ankle joint midway between malleoli
Ankle AP Stress View

Purpose: Verify ligament tears after inversion or eversion injury. This view helps in assessing the stability of the ankle joint and identifying ligamentous injuries.
Patient Position: As comfortable as possible, may require anesthetic for optimal positioning
Positioning:
- Adjust foot to extreme stress position, ensuring the plantar aspect is properly aligned
- Patient or physician holds position to maintain stress on the joint
Central Ray:
- Perpendicular to IR
- Through ankle joint midway between malleoli
Video Credit : Brown’s Medical Imaging
Video Credit : Radiologyinstructor
Additional Considerations
When to Use X-rays for Heel Pain and Calcaneus Fractures
While x-rays are valuable diagnostic tools, they’re not always necessary for conditions like plantar fasciitis. X-rays are most useful for:
- Ruling out bone-related issues (e.g., stress fractures, heel spurs). An x-ray of the calcaneus is often ordered to rule out these conditions.
- Assessing chronic heel pain that doesn’t respond to conservative treatment
- Evaluating trauma-related injuries, especially when fractures or dislocations are suspected
Alternatives to X-rays
In some cases, other imaging modalities may be more appropriate:
- Ultrasound: Useful for examining soft tissue and detecting plantar fasciitis. It provides real-time imaging and can help guide interventions.
- MRI: Provides detailed images of both soft tissue and bone structures. It’s particularly useful for detecting stress fractures and soft tissue injuries.
- CT scan: Offers 3D images, especially useful for complex fractures. Computed tomography provides detailed 3D images, particularly beneficial for surgical planning in complex calcaneal fractures.
Patient Care and Communication
Always prioritize patient comfort and safety during positioning. Clearly explain the procedure and its importance to the patient. Be prepared to modify techniques for patients with limited mobility or pain. Effective communication can help reduce patient anxiety and improve cooperation during the imaging process.
Conclusion
Mastering these radiographic positioning techniques for heel and ankle x-rays is essential for producing high-quality diagnostic images. By understanding the purpose of each view and perfecting your positioning skills, you’ll contribute significantly to accurate diagnoses and effective patient care. Remember that proper positioning is crucial for obtaining diagnostic-quality images, which in turn play a vital role in guiding treatment decisions and improving patient outcomes.
For more in-depth information on radiography techniques and continuing education opportunities, explore our other resources at CE4RT.com.
Read More About X-Ray CE Credits
